How to Brighten a Picture in Photoshop: 3 Ways to Lighten Images
Adobe Photoshop offers a number of different ways to do things. When it comes to lightening a photo (or darkening for that matter) there are several different ways you can do it. Three of the easiest and most effective methods of improving an image are shown in this tutorial.
Here is a look at the sample photo we'll be editing throughout this article:
How to Brighten a Picture in Photoshop
1. Use an Exposure Adjustment Layer
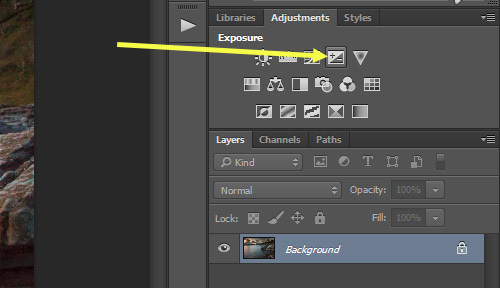
One of the most basic ways to lighten an underexposed photo or image in Adobe Photoshop is to use an exposure adjustment layer to increase the exposure while editing. To add one simply click on the icon shown below.
In the layers palette, you'll see the new adjustment layer above the background layer.
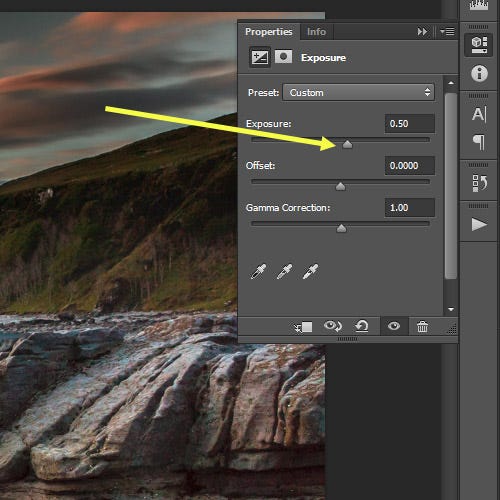
The exposure adjustment layer gives you 3 sliders that you can work with to alter the original image: exposure, offset, and gamma correction. Move the exposure slider to the right to lighten the photo.
The offset slider will impact the shadow areas of the photo. Move the slider to the right to lighten the shadows. The gamma slider will impact the mid-tones of the photo. Unlike the first two sliders, with the gamma slider you will move it to the left to lighten.
With an exposure adjustment layer, you'll want to be very careful as these sliders can impact your photo with only small changes. Here is our sample photo after adjusting the exposure slider to 0.50 and the gamma correction to 1.15.
You may also want to adjust the contrast after changing the exposure. You can use a contrast adjustment layer to give a slight boost to the contrast.
2. Use a Curves Adjustment Layer
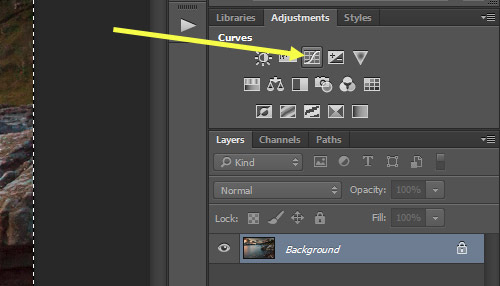
The next option is to use curves to lighten the photo in Adobe Photoshop. Curves can be a little intimidating at first, but once you get used to it, you will love using curves in your editing. To add a curves adjustment layer click on the icon shown below.
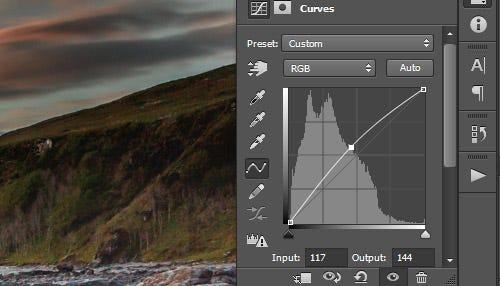
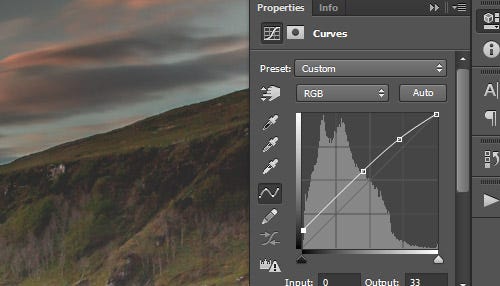
With the help of curves, you can selectively lighten the parts of the photo that you want. The right end of the curve impacts the highlights of the photo, the left end impacts the shadows, and the middle impacts the mid-tones. How you use the curve will depend on your image and what you want to lighten, but one easy approach is to lift the center of the RGB curve to lighten the mid-tones.
The curve above results in the image shown below.
Another option is to use a curve like the one below that will create a soft hazy effect.
Here is the result on our sample photo:
3. Use a Levels Adjustment Layer
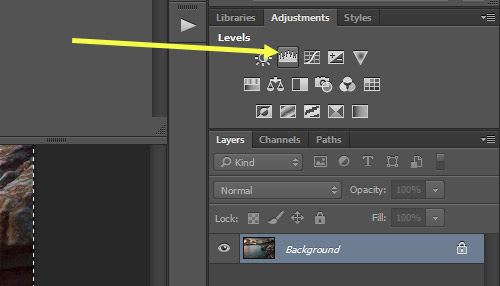
In addition to exposure and curves adjustment layers, levels is a third option that works really well. In addition to lightening or brightening a picture, levels can also be used to control contrast. To add a levels adjustment layer in Adobe Photoshop CC or Photoshop Elements, click on the icon shown below.
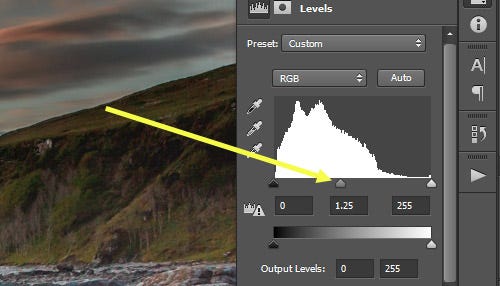
With levels you can move the middle point to the left to lighten the mid tones, or move the right point to the left to lighten highlights (be careful not to blow out the highlights).
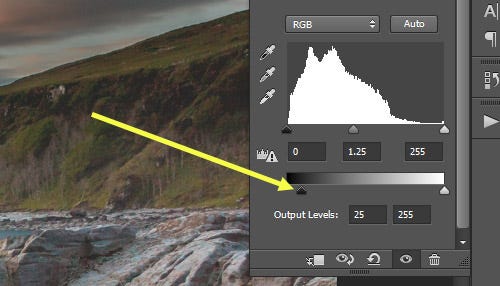
You can also move the black output slider to the right, which can give a hazy type of lightness.
Here is the sample photo after adjusting the levels.
Final Thoughts
All of the methods covered in this Photoshop tutorial allow you to lighten your dark photos with some degree of control and selectivity. In each case, you'll be using an adjustment layer, so there's no need to create a new layer aside from the adjustment layer, and your work is completely non-destructive.
Alternatively, you could use Camera Raw within Adobe Photoshop (especially useful if you're working with a RAW file instead of a JPG) and adjust the exposure slider. You can also adjust vibrance and saturation to improve color if the photo gets too light.
If you need to selectively adjust the lightness or brightness of an image is certain places without impacting the entire image, you can use a layer mask to control which areas are impacted.
Next time you have a dark picture that you want to lighten, try the 3 techniques for image adjustments and see which one works best for your photo.
Photo via FrankyFromGermany/Pixabay


